


"Серверийн таниулбарыг баталгаажуулах боломжгүй" iPhone-г засах шилдэг шийдэл
IPhone нь хэрэглэгчийн гөлгөр, аюулгүй туршлагаараа алдартай боловч аливаа ухаалаг төхөөрөмжийн нэгэн адил хааяа алдаа гаргахаас хамгаалдаггүй. iPhone хэрэглэгчдэд тулгардаг хамгийн ойлгомжгүй, нийтлэг асуудлын нэг бол аймшигт мессеж юм. "Серверийн таниулбарыг баталгаажуулах боломжгүй." Энэ алдаа нь ихэвчлэн SSL (Secure Socket Layer) ашиглан таны имэйл рүү нэвтрэх, Safari дээр вэб сайт үзэх, ямар нэгэн үйлчилгээнд холбогдох үед гарч ирдэг.
Энэ зурвас таны iPhone серверийн SSL сертификатыг баталгаажуулах гэж оролдох ба гэрчилгээний хугацаа дууссан, тохироогүй, итгэмжгүй эсвэл гуравдагч этгээд саатуулсан эсэхээс үл хамааран ямар нэг алдаа олсон үед гарч ирнэ. Хэдийгээр энэ нь аюулгүй байдлын асуудал мэт санагдаж болох ч энэ нь ихэвчлэн жижиг тохиргоо эсвэл сүлжээтэй холбоотой асуудлаас үүдэлтэй байдаг.
Энэ гарын авлагад та iPhone дээрх "Серверийн таниулбарыг баталгаажуулах боломжгүй" асуудлыг шийдэж, бүх зүйлийг дахин хэвийн болгох шилдэг шийдлүүдийг сурах болно.
1. iPhone "Серверийн таниулбарыг баталгаажуулж чадахгүй байна" гэсэн алдааг арилгах түгээмэл үр дүнтэй шийдлүүд
Хурдан дахин эхлүүлэхээс эхлээд илүү нарийн тохируулга хүртэл хэд хэдэн үр дүнтэй засваруудыг доороос харж болно.
1) iPhone-оо дахин эхлүүлнэ үү
Энгийн дахин асаалтаар эхлүүлээрэй: iPhone-оо унтраахын тулд гулсуулж, хэдэн секунд хүлээгээд дахин асаана уу.
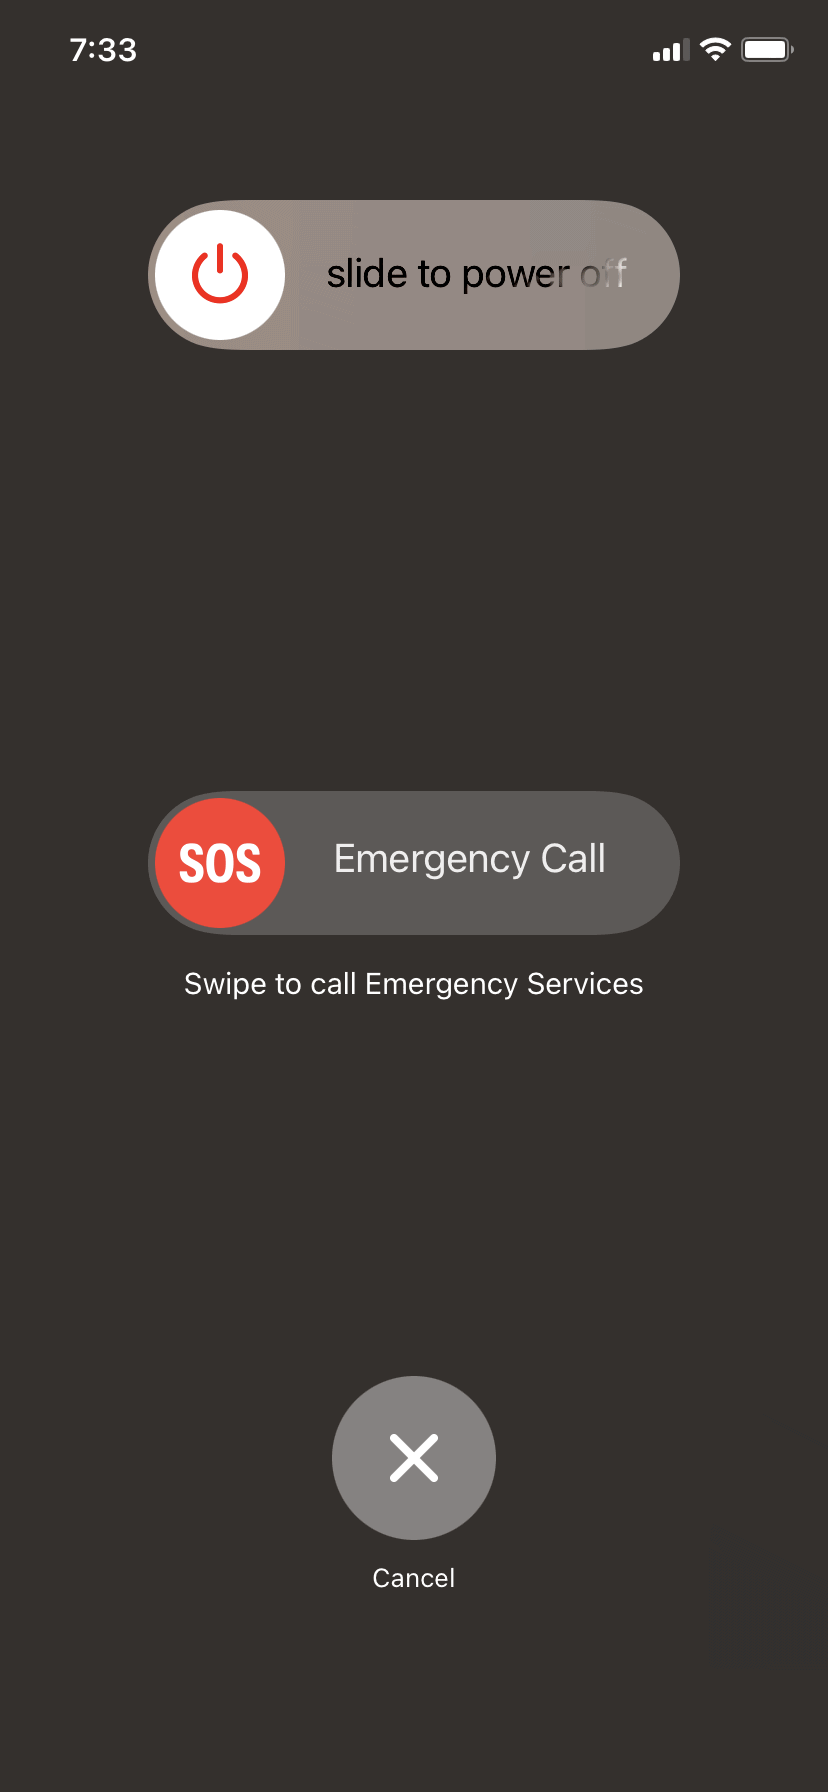
Яагаад ажилладаг вэ: Програм хангамжийн түр зуурын алдаа нь заримдаа SSL сертификатыг баталгаажуулахад саад болдог.
2) Нислэгийн горимыг асаах/унтраах
Нээх бол доош шударна уу
Хяналтын төв
, дээр товш
Нислэгийн горим
дүрсийг сонгоод 10 секунд хүлээгээд унтраа.
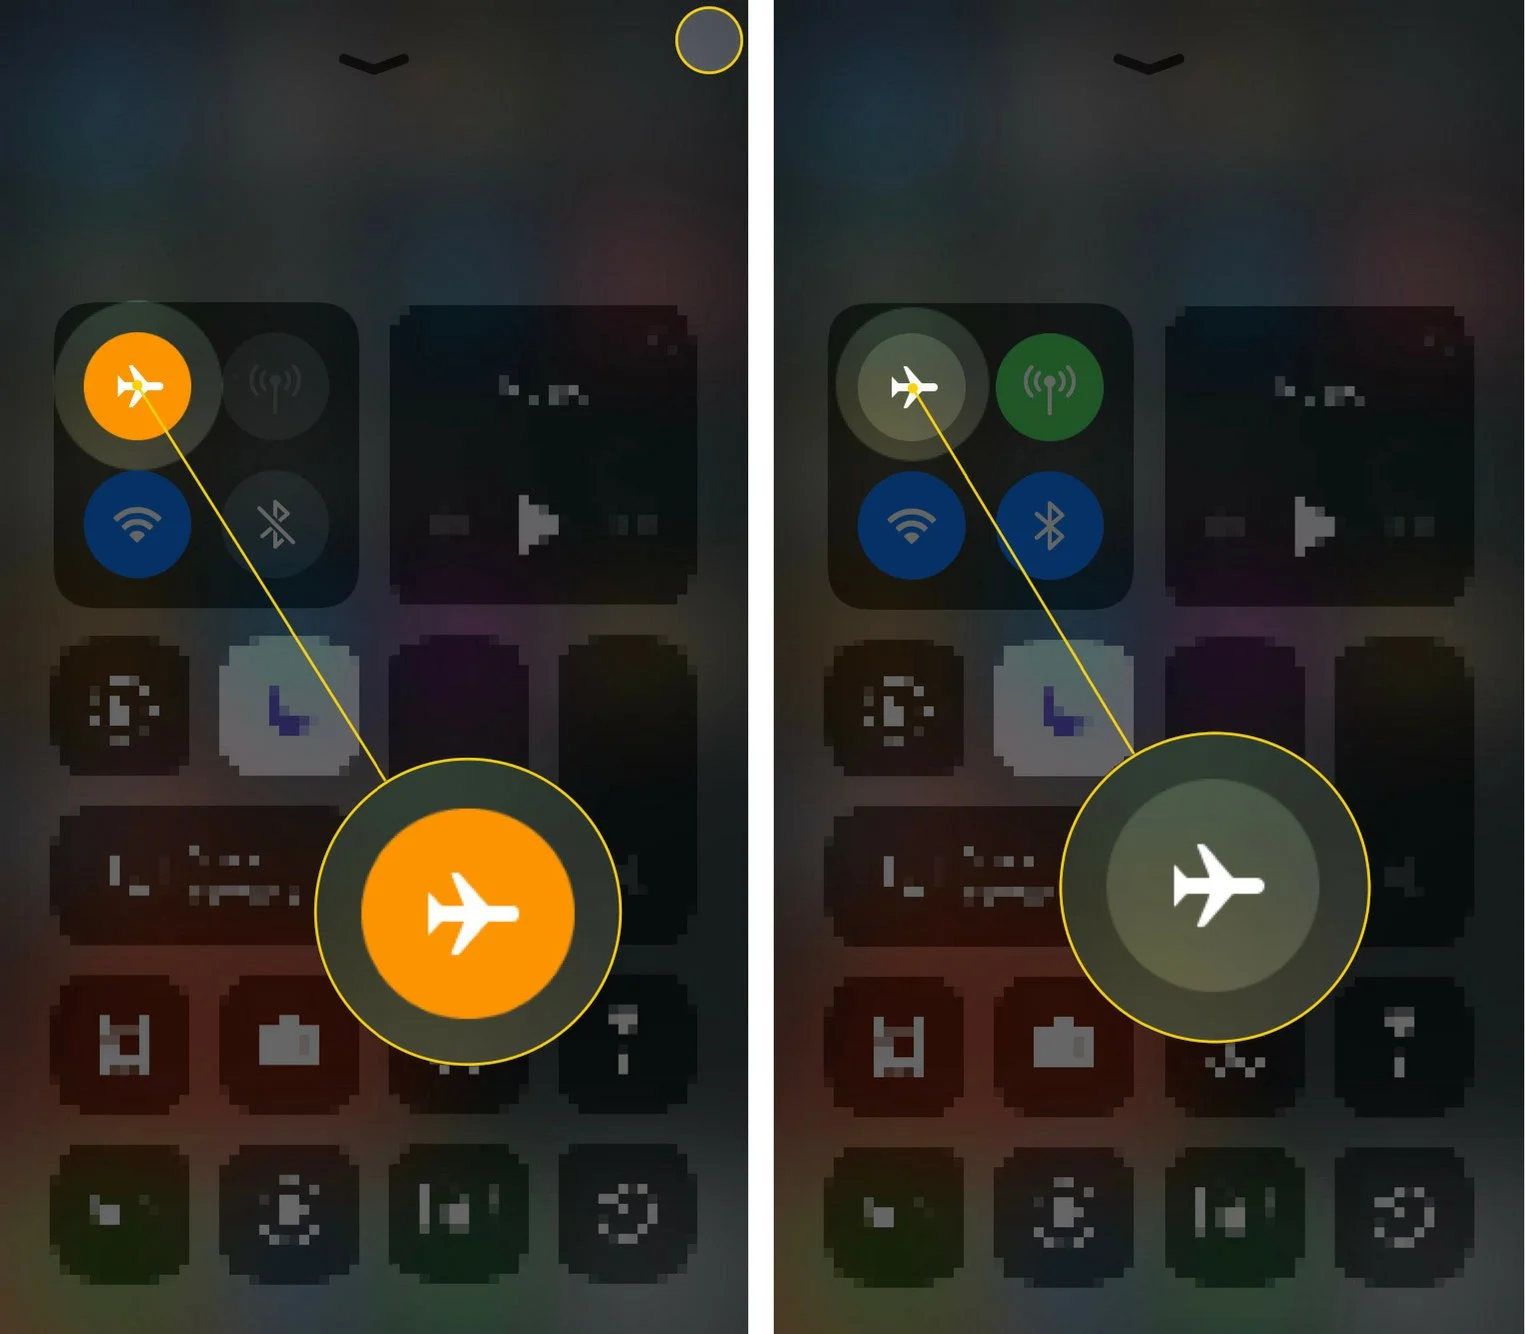
Энэ үйлдэл нь таны холболтыг дахин тохируулах бөгөөд энэ нь серверийн баталгаажуулалттай холбоотой асуудлуудыг засах болно.
3) iOS-г хамгийн сүүлийн хувилбар болгон шинэчилнэ үү
Apple-ийн шинэчлэлтүүд нь ихэвчлэн аюулгүй байдал, гэрчилгээний сайжруулалтыг агуулдаг
Тохиргоо > Ерөнхий > Програм хангамжийн шинэчлэл
болон товшино уу
Татаж аваад суулгана уу
хэрэв байгаа бол.
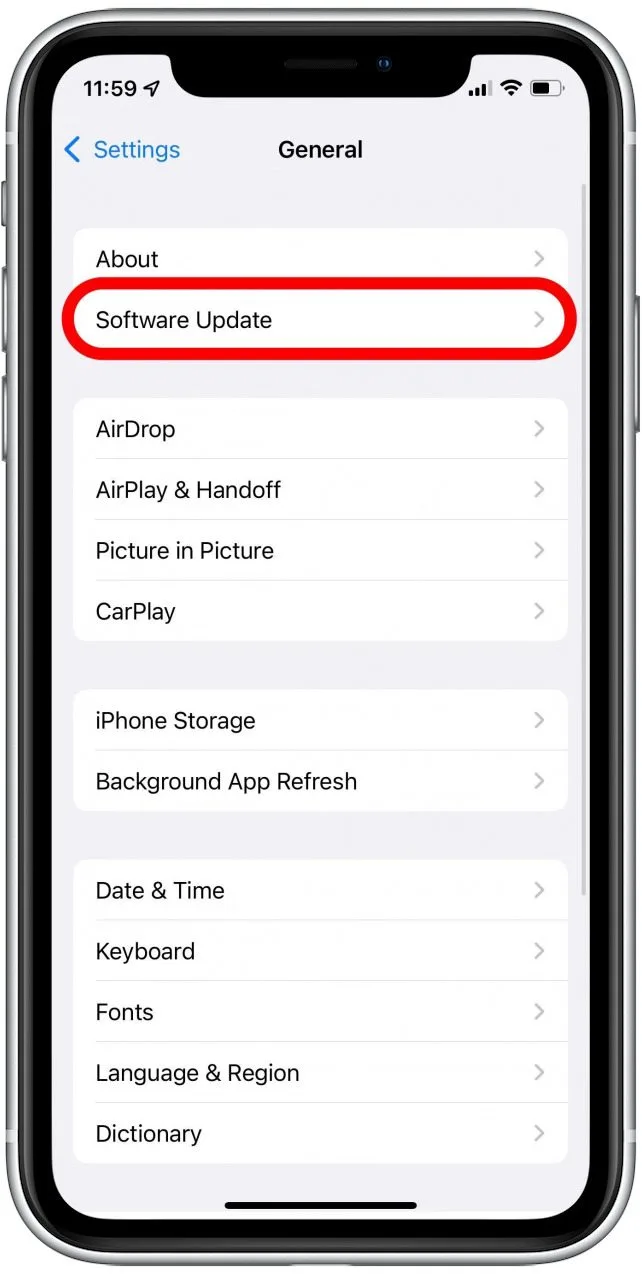
Яагаад ажилладаг вэ: iOS-ийн хуучирсан хувилбарууд нь шинэчлэгдсэн эсвэл шинэ SSL сертификатуудыг танихгүй байж магадгүй.
4) Имэйл бүртгэлээ устгаад дахин нэмнэ үү
Хэрэв мэйл аппликейшн энэ асуудлыг гаргавал бүртгэлээ устгаад буцааж нэмж үзнэ үү
руу оч
Тохиргоо > Мэйл > Бүртгэл
, асуудалтай бүртгэлийг сонгоод товш
Бүртгэл устгах
, дараа нь буцах
Бүртгэл нэмэх
болон нэвтрэх мэдээллээ оруулна уу.
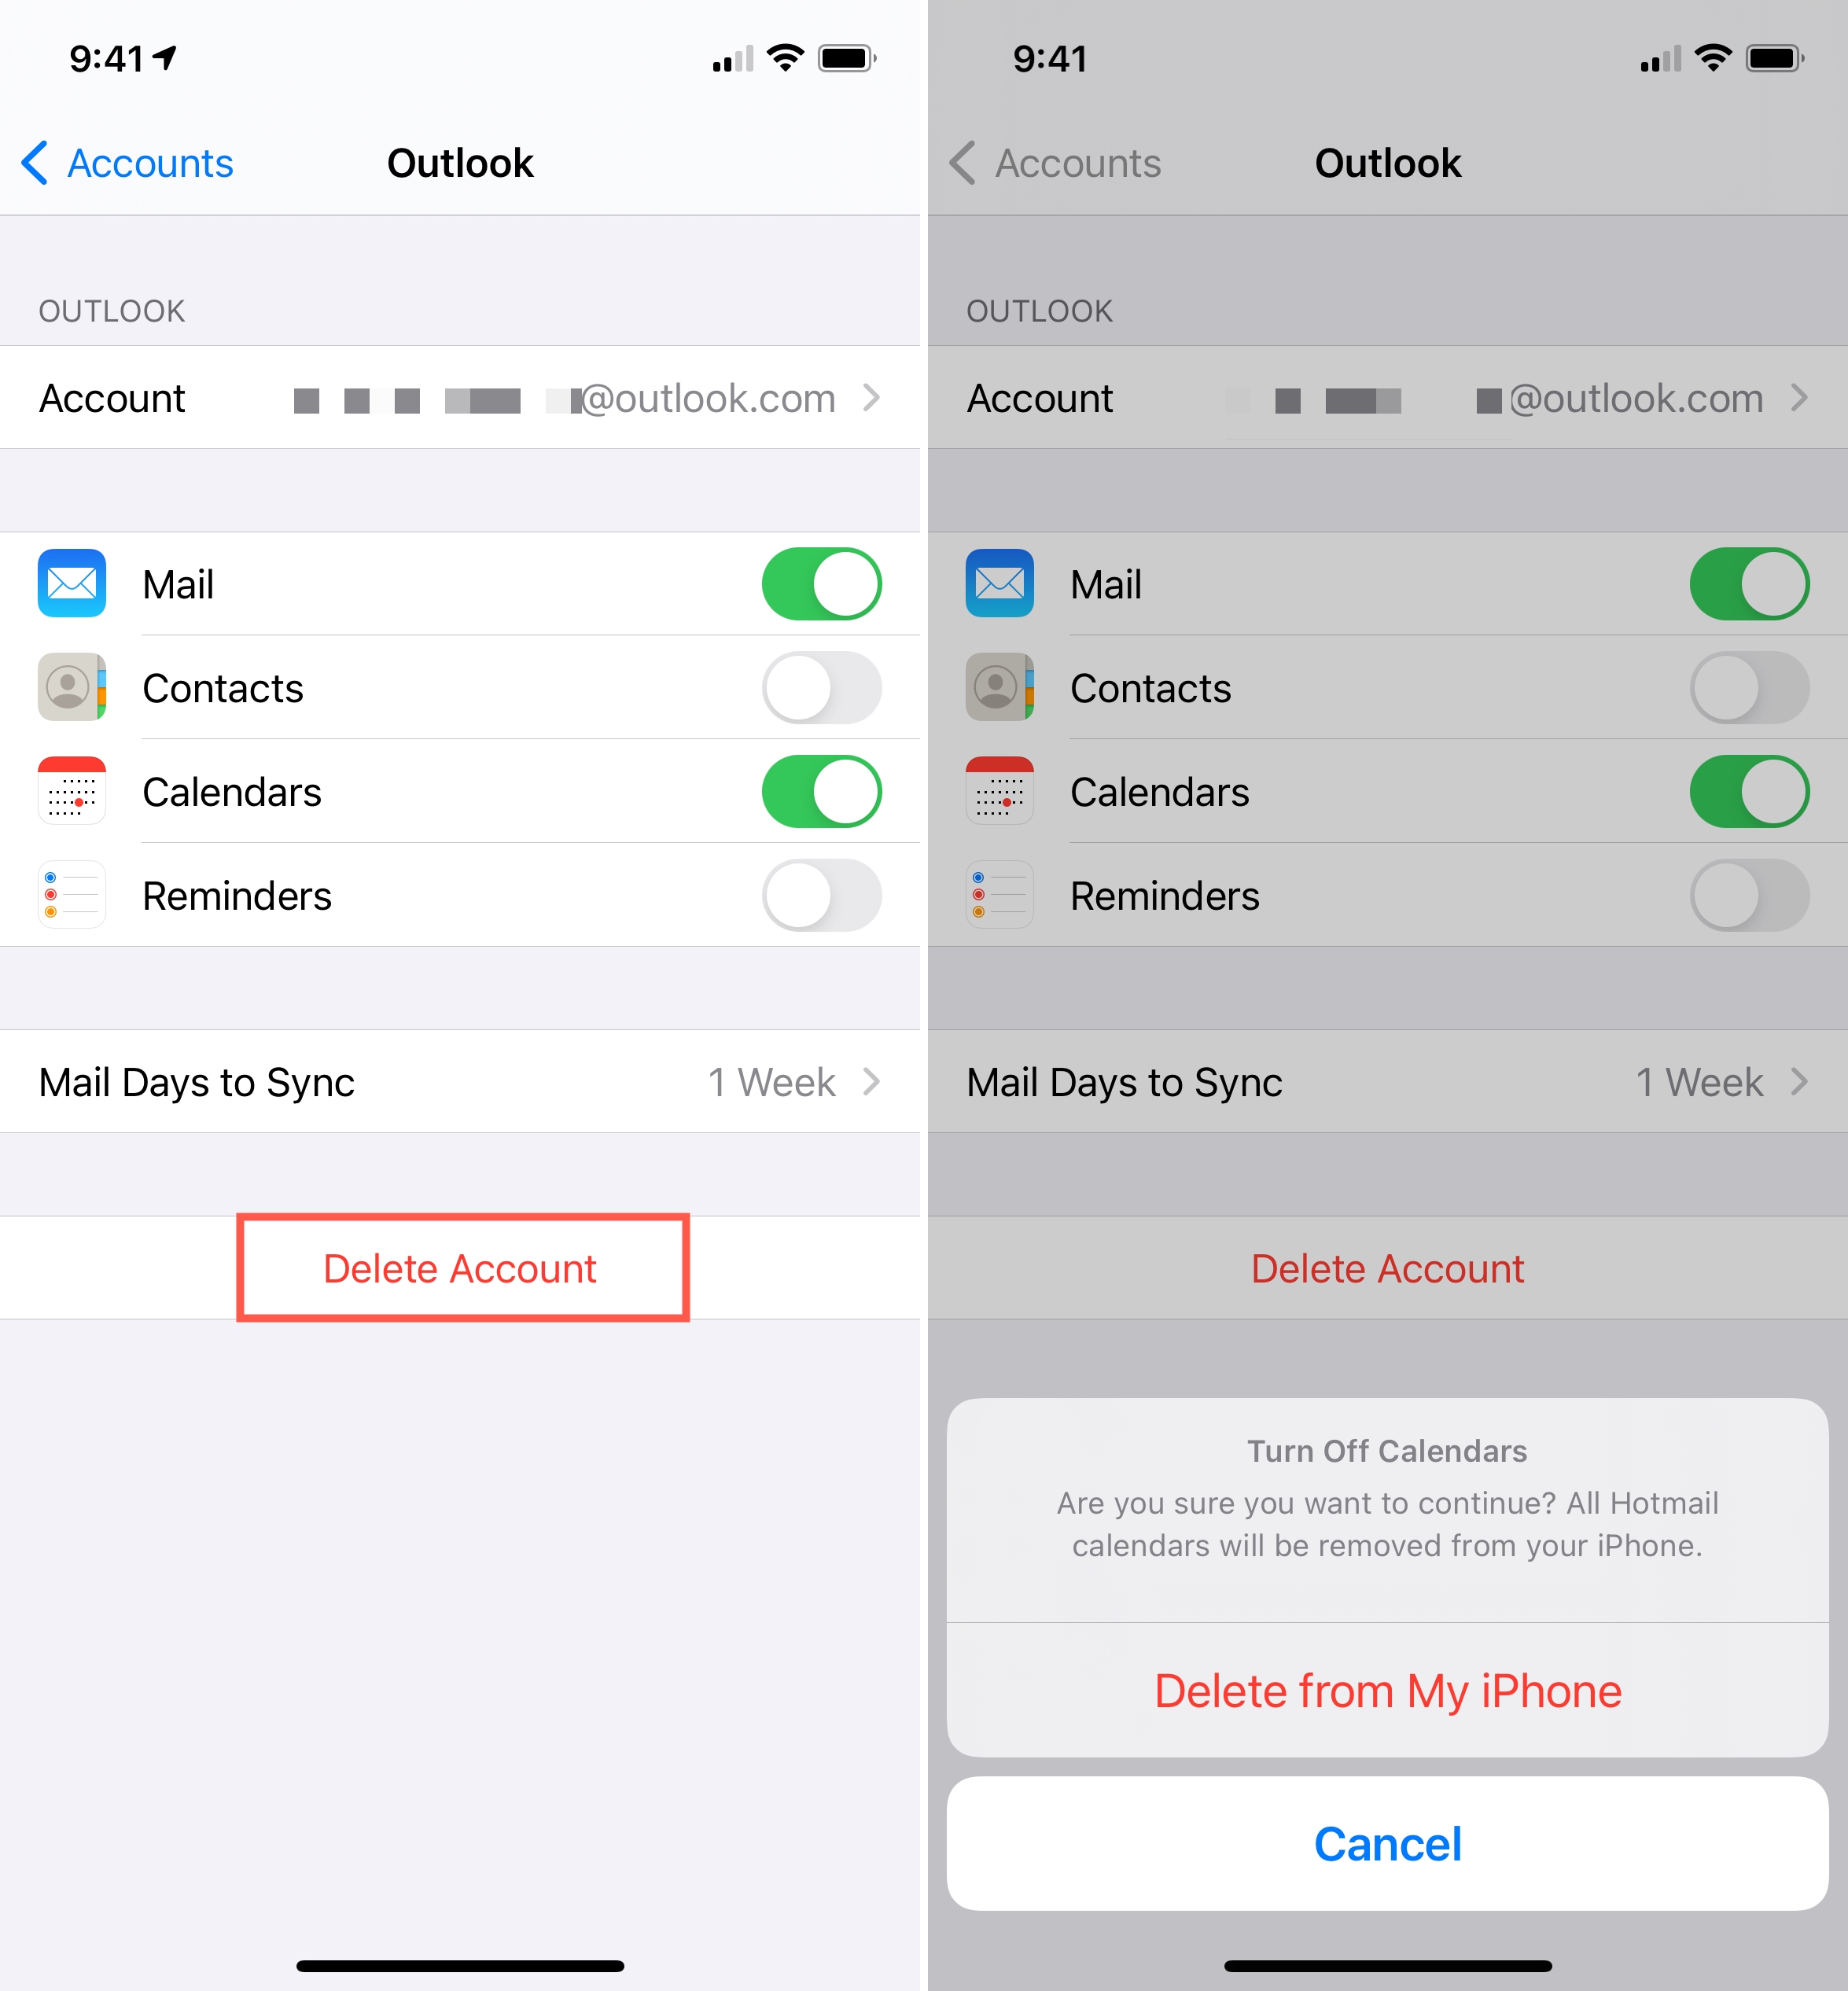
Энэ яагаад ажилладаг вэ: Эвдэрсэн эсвэл хуучирсан имэйлийн тохиргоо нь SSL таарахгүй байх шалтгаан болдог. Дахин нэмэх нь үүнийг арилгана.
5) Сүлжээний тохиргоог дахин тохируулах
Сүлжээний тохиргоо нь SSL харилцаанд гол үүрэг гүйцэтгэдэг.
- руу шилжих Тохиргоо > Ерөнхий > iPhone шилжүүлэх эсвэл дахин тохируулах > Дахин тохируулах > Сүлжээний тохиргоог дахин тохируулах .

Энэ нь хадгалсан Wi-Fi сүлжээ болон VPN тохиргоог устгах тул та мэдээллээ нөөцөлсөн эсэхээ шалгаарай.
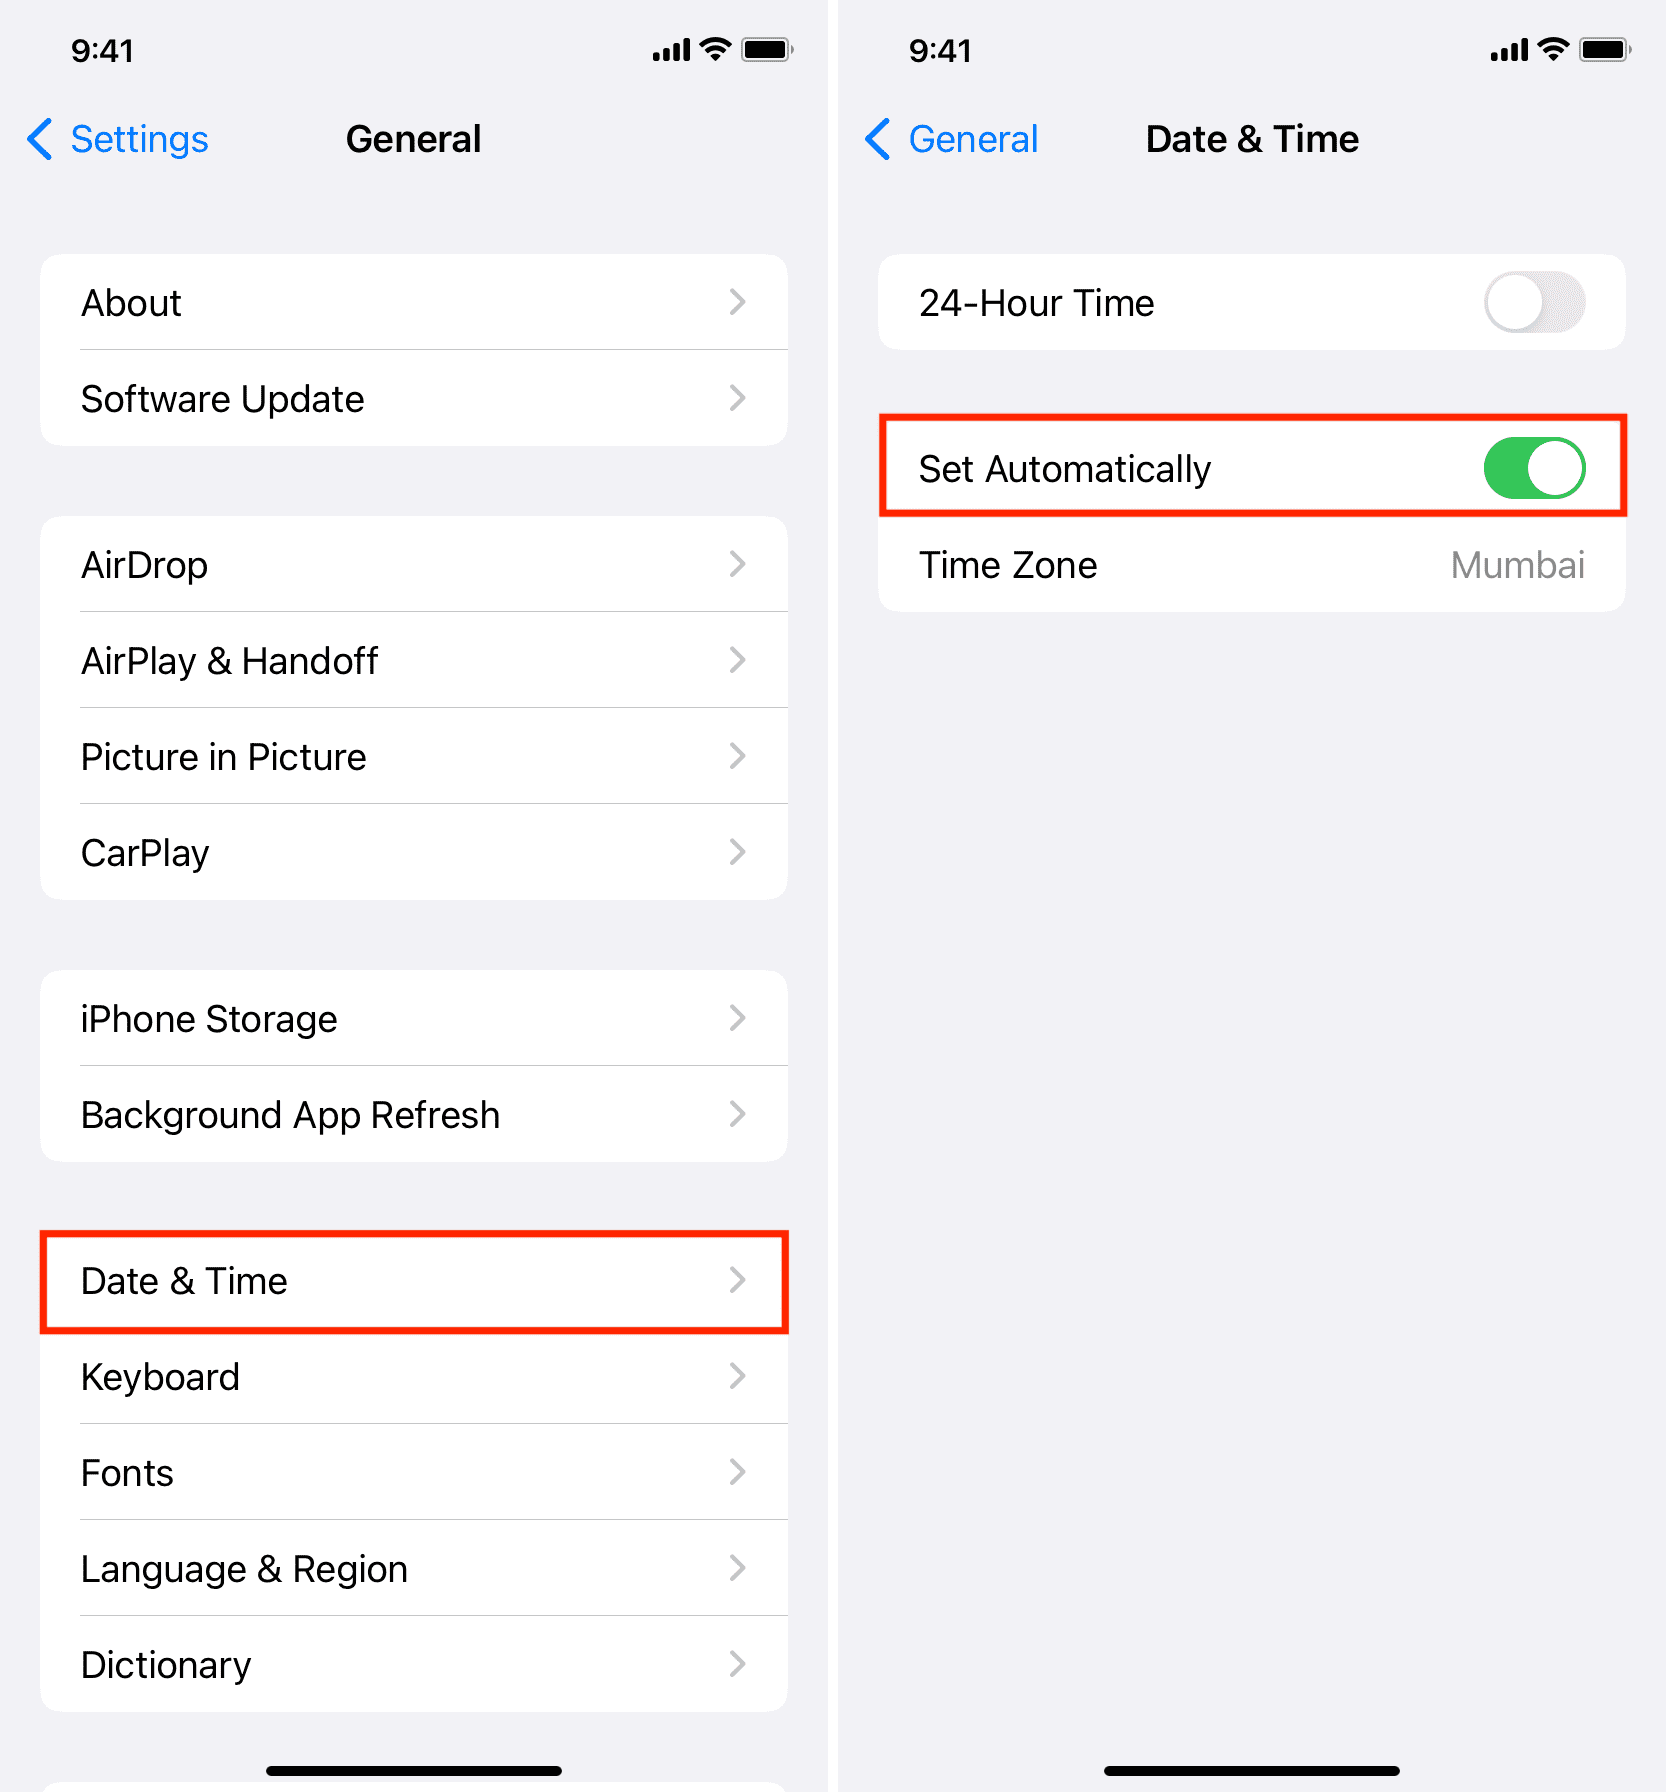
6) Огноо, цагийг автоматаар тохируулах
SSL сертификат нь цаг хугацааны хувьд мэдрэмтгий байдаг. Системийн буруу цаг нь баталгаажуулалтын алдаа гаргахад хүргэдэг.
Үүнийг засахын тулд дараах руу очно уу
Тохиргоо > Ерөнхий > Огноо ба цаг
болон идэвхжүүлнэ
Автоматаар тохируулах
.
7) Safari кэшийг арилгах (хэрэв хөтөч дээр алдаа гарвал)
Заримдаа асуудал нь Safari-д хадгалагдсан SSL сертификаттай холбоотой байдаг.
- руу оч Тохиргоо> Safari> Түүх болон вэбсайтын өгөгдлийг арилгах .
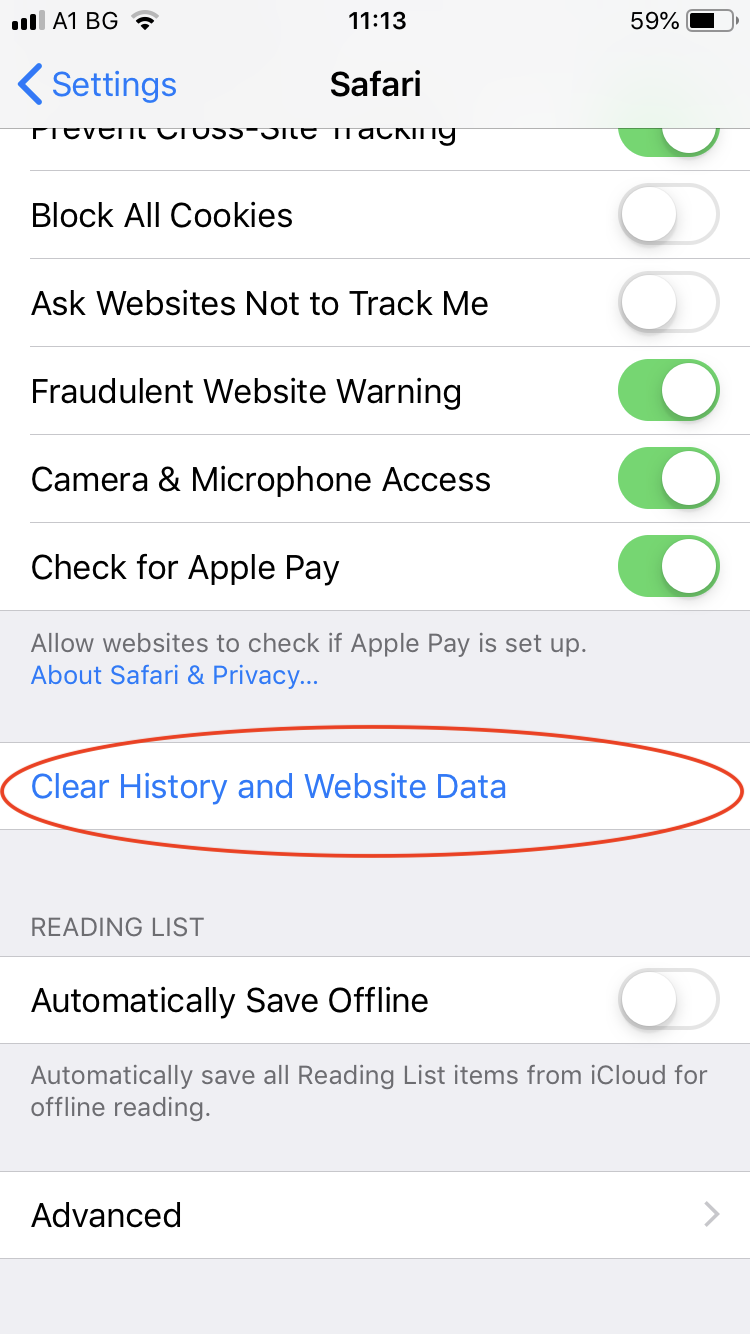
Энэ нь бүх хайлтын түүх, күүки болон кэштэй гэрчилгээг устгана.
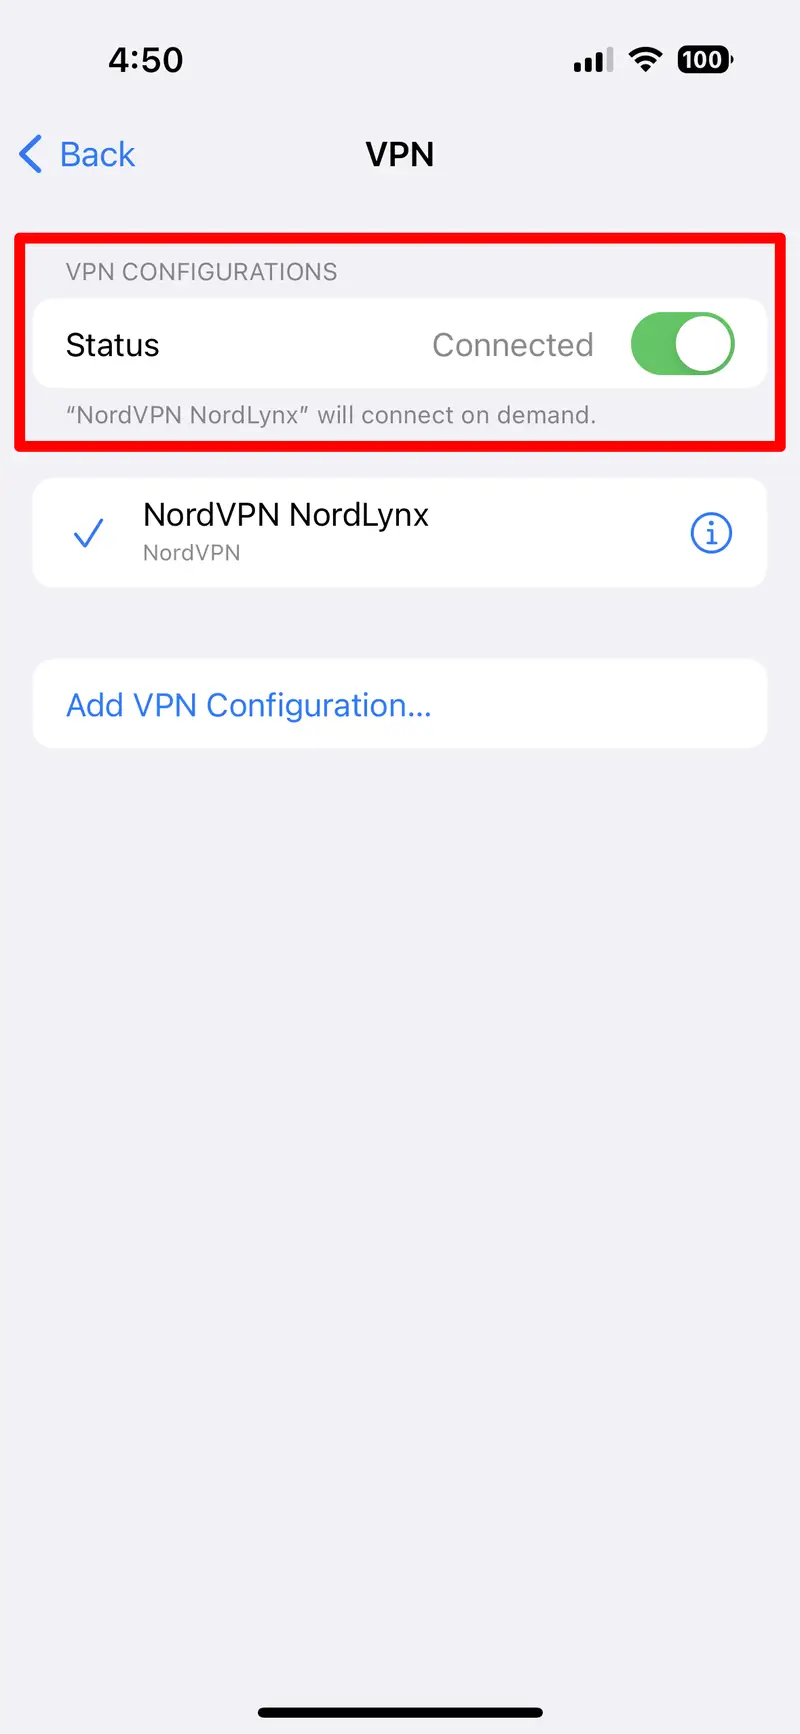
8) VPN-г идэвхгүй болгох эсвэл өөр сүлжээг туршиж үзээрэй
Хэрэв та нийтийн Wi-Fi сүлжээнд холбогдсон эсвэл VPN ашиглаж байгаа бол эдгээр нь аюулгүй гэрчилгээний шалгалтыг блоклох эсвэл өөрчлөх боломжтой.
Нийтийн сүлжээнээс салж, мобайл дата руу шилжинэ үү
Тохиргоо > VPN
ямар ч идэвхтэй VPN-г унтраа.
9) Альтернатив шуудангийн програмыг ашиглана уу
Хэрэв Apple Mail програм алдааг харуулсаар байвал гуравдагч талын имэйл клиентийг ашиглаж үзнэ үү:
- Microsoft Outlook
- Gmail
- Оч
Эдгээр програмууд нь серверийн гэрчилгээтэй ажиллахдаа ихэвчлэн өөр өөр аргыг ашигладаг бөгөөд асуудлыг даван туулж магадгүй юм.
2. Нарийвчилсан шийдэл: iPhone-г AimerLab FixMate ашиглан "Серверийн таниулбарыг баталгаажуулж чадахгүй байна" гэснийг засах
Дээрх шийдлүүд асуудлыг шийдэж чадахгүй бол таны iPhone системийн түвшний гүнзгий алдаа эсвэл iOS-ийн эвдрэлээс болж зовж шаналж магадгүй бөгөөд энд AimerLab FixMate гарч ирдэг.
AimerLab FixMate iOS-тэй холбоотой 200 гаруй асуудлыг шийдвэрлэх боломжтой бөгөөд дараах асуудлуудыг цогцоор нь шийддэг.
- Apple лого дээр гацсан
- Ачаалах гогцоо
- Хөлдөөсөн дэлгэц
- iOS шинэчлэлтийн алдаа
- "Серверийн таниулбарыг баталгаажуулах боломжгүй" болон ижил төстэй SSL эсвэл имэйлтэй холбоотой алдаа
Алхам алхмаар зааварчилгаа: iPhone-г засах нь AimerLab FixMate ашиглан серверийн таниултын алдааг баталгаажуулж чадахгүй байна.
- FixMate Windows суулгагчийг авахын тулд албан ёсны AimerLab вэб сайт руу орж, тохируулах процессыг дуусгана уу.
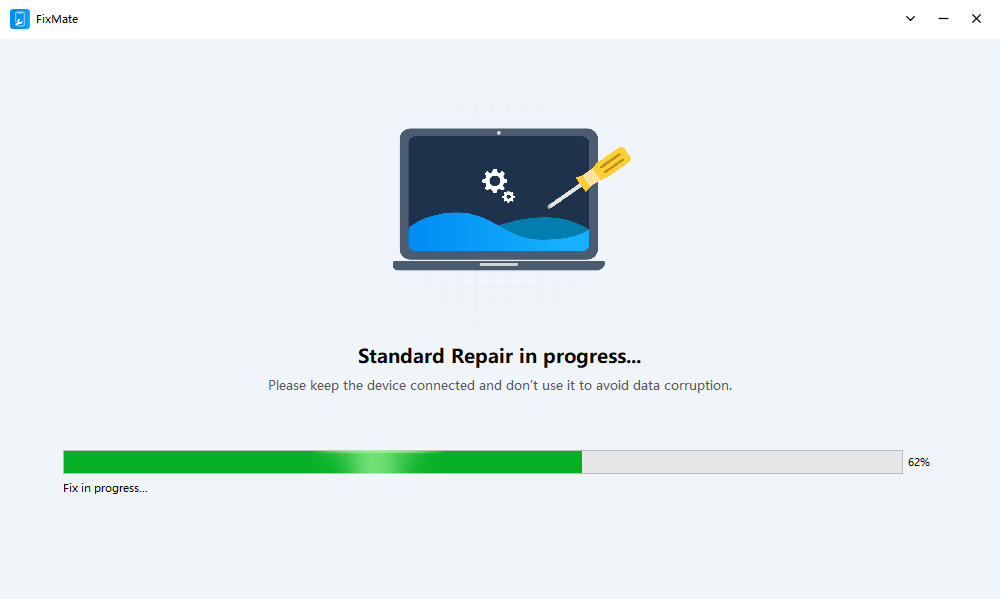
- FixMate-г нээж, iPhone-оо USB кабель ашиглан холбож, дараа нь iPhone-оо өгөгдөл алдалгүйгээр засварлахын тулд Стандарт засварын горимыг сонго.
- FixMate нь таны iPhone загварыг илрүүлж, тохирох iOS програмын хувилбарыг танилцуулах бөгөөд үйл явцыг эхлүүлэхийн тулд товшино уу.
- Програм хангамжийг татаж авсны дараа стандарт засварыг эхлүүлэхийн тулд товшоод баталгаажуулна уу. Процесс нь хэдэн минут шаардагдах бөгөөд таны iPhone дахин асч, засварлагдсаны дараа хэвийн ажиллах болно.
3. Дүгнэлт
IPhone дээрх "Серверийн таниулбарыг баталгаажуулах боломжгүй" алдаа нь таныг чухал имэйл эсвэл вэбсайт руу нэвтрэхэд саад учруулж болзошгүй. Ихэнх тохиолдолд утсаа дахин асаах, iOS-г шинэчлэх, имэйл хаягаа дахин нэмэх зэрэг энгийн алхамууд нь асуудлыг шийдэх болно. Гэсэн хэдий ч эдгээр стандарт шийдлүүд ажиллахгүй бол үндсэн шалтгаан нь iOS системд илүү гүн гүнзгий оршдог байх магадлалтай.
Эндээс л AimerLab FixMate үнэлж баршгүй юм. Стандарт горимын тусламжтайгаар та нэг зураг, мессеж, програмыг алдалгүйгээр алдаагаа засах боломжтой. Энэ нь хурдан, найдвартай бөгөөд стандарт алдааг олж засварлахад хүрч чадахгүй байгаа алдааны төрлүүдийг зохицуулахад зориулагдсан.
Хэрэв таны iPhone таны хүчин чармайлтыг үл харгалзан серверийн таних тэмдгийн алдааг харуулсаар байвал стрессдэж цаг бүү үрээрэй – татаж аваарай.
AimerLab FixMate
Энэ нь таны iPhone-ийн ажиллагааг хэдхэн минутын дотор сэргээх боломжийг олгоно.
- Яагаад миний гар чийдэн iPhone дээр ажиллахгүй байна вэ?
- "Шинэчилсэн iPhone эсвэл одоо iPhone толин тусгал ажиллахгүй байна" асуудлыг хэрхэн шийдвэрлэх вэ?
- iPhone дээрх 75 дугаар алдааг хэрхэн засах вэ?
- iPhone iOS 18 дээр нууц үгээ хэрхэн олох вэ?
- Яагаад миний iPhone дуугарахгүй байна вэ? Үүнийг засах үр дүнтэй аргууд
- iPhone-оо буруу байршилд олох асуудлыг хэрхэн засах вэ?
- IPhone дээр Pokemon Go-г хэрхэн хуурах вэ?
- Aimerlab MobiGo GPS-ийн байршлын спуферийн тойм
- IPhone дээрх байршлыг хэрхэн өөрчлөх вэ?
- IOS-д зориулсан GPS-ийн шилдэг 5 хуурамч байршил
- GPS-ийн байршил хайгчийн тодорхойлолт болон хуурамчаар үйлдэх санал
- Snapchat дээрх байршлаа хэрхэн өөрчлөх вэ
- IOS төхөөрөмж дээр байршлыг хэрхэн олох/хуваалцах/нуух вэ?